Assignment from: http: // cs231n.github.io / assignments2018 / assignment1/
目标:
- a fully - vectorized loss function for the SVM
- fully - vectorized expression for its analytic gradient
- use a validation set to tune the learning rate and regularization strength
- optimize the loss function with SGD
- visualize the final learned weights
Set up部分
1 | # Run some setup code for this notebook. |
读取CIFAR-10的数据,预处理
1 | # Load the raw CIFAR-10 data. |
结果:1
2
3
4Training data shape: (50000, 32, 32, 3)
Training labels shape: (50000,)
Test data shape: (10000, 32, 32, 3)
Test labels shape: (10000,)
可视化dataset
- 从类型中
1
2
3
4
5
6
7
8
9
10
11
12
13
14
15
16
17# Visualize some examples from the dataset.
# We show a few examples of training images from each class.
classes = ['plane', 'car', 'bird', 'cat', 'deer',
'dog', 'frog', 'horse', 'ship', 'truck']
num_classes = len(classes)
samples_per_class = 7
for y, cls in enumerate(classes):
idxs = np.flatnonzero(y_train == y)
idxs = np.random.choice(idxs, samples_per_class, replace=False)
for i, idx in enumerate(idxs):
plt_idx = i * num_classes + y + 1
plt.subplot(samples_per_class, num_classes, plt_idx)
plt.imshow(X_train[idx].astype('uint8'))
plt.axis('off')
if i == 0:
plt.title(cls)
plt.show()
1 | np.flatnonzero(y_train == y) |
返回内容非0的index。这句是返回plane类别里面的(y_train == y)所有非0的内容。然后从这些里面随机选择7个内容,画出来。
结果如下:
进一步分为几部分
1 | # Split the data into train, val, and test sets. In addition we will |
1 | mask = range(num_test) |
感觉这是一种从一个整体中选取其中一部分的代码
将image拉成row
1 | # Preprocessing: reshape the image data into rows |
- 当想把无论任何大小的东西拉成一整行的时候,用a.reshape(x, -1)。 X_train.shape[0]行,列数未知,但是拉平了
- 如果想拉成一整列的时候,用a.reshape(-1, x)。 列数为x,每列有多少东西未知
预处理部分:减去mean image
第一步,求出训练集的mean并且可视化
1
2
3
4
5
6
7
8# Preprocessing: subtract the mean image
# first: compute the image mean based on the training data
mean_image = np.mean(X_train, axis=0)
print(mean_image[:10]) # print a few of the elements
plt.figure(figsize=(4, 4))
plt.imshow(mean_image.reshape((32, 32, 3)).astype(
'uint8')) # visualize the mean image
plt.show()第二步,从train和test里面减去平均数据
1
2
3
4
5# second: subtract the mean image from train and test data
X_train -= mean_image
X_val -= mean_image
X_test -= mean_image
X_dev -= mean_image第三步,把预处理好的所有图片的末尾(拉成行之后的最后)加了一个1(bias的dim)
1
2
3
4
5
6
7
8# third: append the bias dimension of ones (i.e. bias trick) so that our SVM
# only has to worry about optimizing a single weight matrix W.
X_train = np.hstack([X_train, np.ones((X_train.shape[0], 1))])
X_val = np.hstack([X_val, np.ones((X_val.shape[0], 1))])
X_test = np.hstack([X_test, np.ones((X_test.shape[0], 1))])
X_dev = np.hstack([X_dev, np.ones((X_dev.shape[0], 1))])
print(X_train.shape, X_val.shape, X_test.shape, X_dev.shape)
np.hstack(),沿着水平方向把数组叠起来。
于此相同,np.vstack(),是沿着垂直方向把数组叠起来。
SVM classifier
1 | cs231n / classifiers / linear_svm.py. |
svm_loss_naive
- 有三个输入
- X:一个有N个元素的minibatch,每个元素的内容是D(N, D)
- W: weights,(D, C), 图片的内容是D,一共C个class,所以用的时候跟普遍想法的W是tranpose的
- y: 标签,大小(N,) 一共N张照片,每张照片有一个标签
- 最终结果
- 一个float的结果:loss
- W的gradient dW
- 注意,Wx求出来的就是不同分类的积分
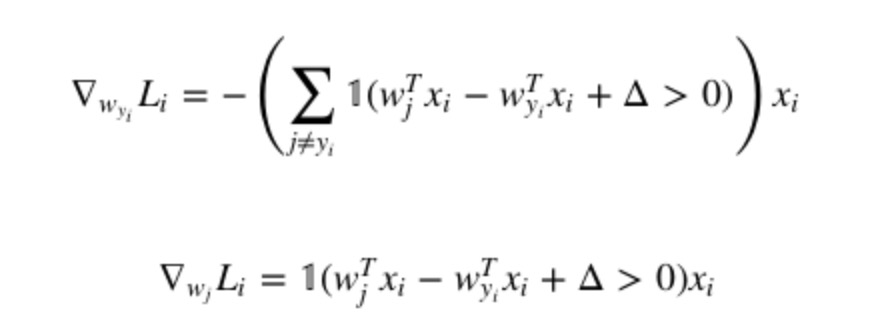
dW的计算(https://blog.csdn.net/zt_1995/article/details/62227201)

- 形状很奇怪的1(x)指的是,当x为真的时候结果是1,当x为假的时候结果取0
- 第一个式子表示第i个被正确分类的梯度
- 有多少个Wj让这个边界值不被满足,就对损失起了多少贡献
- 乘以xi是因为xi包含了样本的全部特征,所以前面乘以一个系数1就可以了
- 符号是因为SGD采用负梯度运算
- 第二个式子表示不正确分类的梯度,只有在yi == j的时候才有贡献,所以没有求和。但是注意,在每张图里面,这个都会在j == yi的时候发生一次,所以每张图的j部分需要加上这个值
- 最终的结果需要,除以N
- 别忘了正则化!而且用2\lanmdaW来正则化的效果更好一些
1 |
|
svm_loss_vectorized
通过向量化来提高计算速度
计算loss部分
- W是一个(D, C)的向量,X是(N, D)的,所以两者相乘可以得到一个(N, C)的矩阵,N为图片数量,C是每张图片对于不同分类的score
- 在score中取每一行的y中label部分就是这张图正确类型的评分
- 把整体的score矩阵的所有项减去正确评分的矩阵(应该可以广播但是我刚开始用repeat和reshape复制了一下),减去的结果就是svm中需要和0比的值(margin)
- 为了求loss,把小于0的项目和正确的项除去(都设置成0)
- 然后行求和,列求和,除以整体的个数,regularzation
计算dW部分
- X.T点乘margin得到的就是最终的loss,所以需要把每个margin里面符合条件的数对了
- 所有比0大的时候都算1(根据导数的计算结果)
- 当应该判断正确的类型比0大的时候,这个东西会在每次计算导数的时候都算上一次,所以是行的合
- 最后乘完之后除以总的个数,再regularzation
1
2
3
4
5
6
7
8
9
10
11
12
13
14
15
16
17
18
19
20
21
22
23
24
25
26
27
28
29
30
31
32
33
34
35
36
37
38
39
40
41
42
43
44
45
46
47
def svm_loss_vectorized(W, X, y, reg):
"""
Structured SVM loss function, vectorized implementation.
Inputs and outputs are the same as svm_loss_naive.
"""
loss = 0.0
dW = np.zeros(W.shape) # initialize the gradient as zero
#############################################################################
# TODO: #
# Implement a vectorized version of the structured SVM loss, storing the #
# result in loss. #
#############################################################################
num_train = X.shape[0]
num_classes = W.shape[1]
scores = X.dot(W)
# 这里是取第N行(图片行)的第C个(class列),得到的是(500,)的正确类的score的矩阵
correct_class_score = scores[np.arange(num_train), y]
# correct_class_score = np.repeat(correct_class_score, num_classes)
# correct_class_score = correct_class_score.reshape(num_train, num_classes)
# DxC
margin = scores - correct_class_score + 1.0
margin[np.arange(num_train), y] = 0.0
margin[margin <= 0] = 0.0
loss += np.sum(np.sum(margin, axis=1)) / num_train
# loss /= num_train
loss += 0.5 * reg * np.sum(W * W)
margin[margin > 0] = 1.0
calculate_times = np.sum(margin, axis=1)
margin[np.arange(num_train), y] = - calculate_times
dW = np.dot(X.T, margin) / num_train
dW += 2 * reg * W
#############################################################################
# END OF YOUR CODE #
#############################################################################
return loss, dW
现在得到了dW和loss,使用SGD来减少loss
训练
- 将整体分成不同的minibatch,使用np.random.choice,注意后面的replce可以选True,这样会重复选择元素但是结果速度好像是更快了
- 将minibatch的结果计算loss和gradient,然后grad * learning rate来update数据
1 | def train(self, X, y, learning_rate=1e-3, reg=1e-5, num_iters=100, |
预测结果
- 已经有了前面的到的训练过的W(self.W)
- Wx算出来的就是分数
- 从每一行里面选择最大的分数就是预测的结果
1
2
3
4
5
6
7
8
9
10
11
12
13
14
15
16
17
18
19
20
21
22
23
24
25
26
27def predict(self, X):
"""
Use the trained weights of this linear classifier to predict labels for
data points.
Inputs:
- X: A numpy array of shape (N, D) containing training data; there are N
training samples each of dimension D.
Returns:
- y_pred: Predicted labels for the data in X. y_pred is a 1-dimensional
array of length N, and each element is an integer giving the predicted
class.
"""
y_pred = np.zeros(X.shape[0])
###########################################################################
# TODO: #
# Implement this method. Store the predicted labels in y_pred. #
###########################################################################
scores = X.dot(self.W)
y_pred = np.argmax(scores, axis=1)
# print(labels.shape)
# print(labels)
###########################################################################
# END OF YOUR CODE #
###########################################################################
return y_pred
交叉验证
- 在作业里,需要选择两个hyper的值,分别是学习率和regularzation的参数,没有采用交叉验证,但是采用了随机搜索,会比grid search更准确一些
- 采用不同的参数组合分别训练这个模型,然后得到各自在validation上面的准确率,这个得到准确率最大的组合的参数
- 注意,在验证的过程中应该选择iter的次数少一点,不然训练的时间会非常长
- 在这个代码里用了rand来得到0到1之间的随机数,这个数乘以hyper的范围的差,然后再加上下限,就是随机得到的最终结果
1 | rand_turple = np.random.rand(50,2) |
结果可视化
1 | # Visualize the learned weights for each class. |
